Task Management
Task management includes the following activities:
Note that in User Guide the default names for the time-track hierarchy levels are used:
- Top level: 'Customer'
- Middle level: 'Project'
- Lowest level: 'Task'
You can change the default names of the hierarchy levels in the general system settings.
See Adjust General System Settings section for more information.
Only users who have 'Manage Tasks' access right can access
the task management interfaces. Note that users who do not have this right will be able to view task information,
but will not be able to modify it.
Browse Open Tasks
When you click on the 'Tasks' option in the top-level menu,
the system shows Open Tasks interface with all open tasks from the projects assigned to you.
To get to this interface from the customer and project management pages,
select 'Open Tasks' option in the second-level menu.
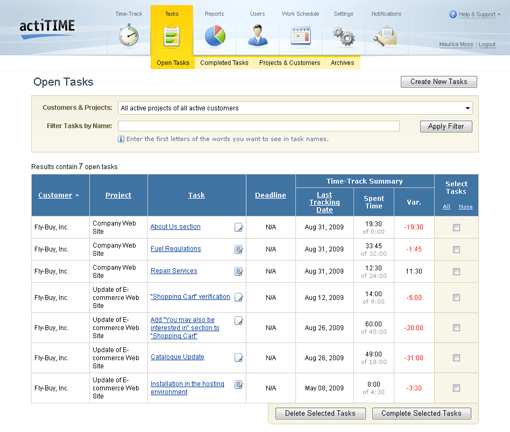
Open Tasks interface
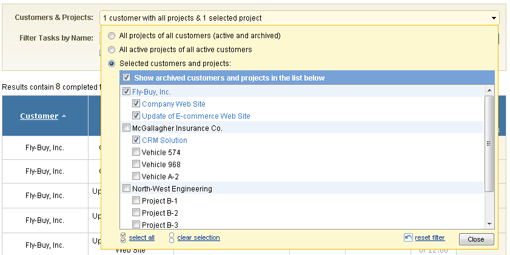
If you want to browse open tasks that are associated with specific customers and/or projects,
select the corresponding customers and projects in the filter located above the task list:
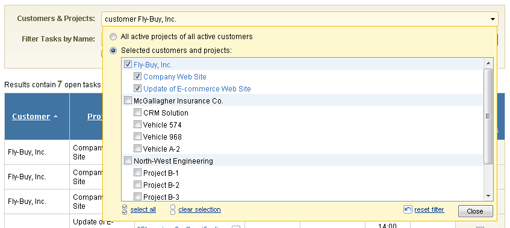
Filter by Customers and Projects
-
Select checkbox near a customer name to get all open tasks of all active projects of this customer
When you select a customer all its projects are automatically selected.
When you de-select a customer, selection is cleared from all customer projects as well.
-
Select checkbox near a project name to get all tasks that are currently open for the selected project.
To select all customer projects but one, select the corresponding customer and then deselect the project you do not want to view.
In addition to filtering tasks by customers and projects, you can filter tasks by words contained in their names.
To filter tasks by words contained in task names enter the first letters of these words in the 'Filter Tasks by Name' field.
For example, you may enter 'des' to find tasks containing word 'design' in their names.
Note that in this case task list will also contain tasks with words
'destination', 'description', 'desired', etc.
To narrow the search results enter more letters of the words to find.
You can specify more than one keyword in the 'Filter Tasks by Name' field.
In this case the system will show the tasks which names contain all the specified words.
After you configured the filter, click 'Apply Filter' button.
Open Tasks interface provides you with brief description of open tasks.
For each of the tasks shown this information includes:
- Customer the task is associated with
- Project the task is associated with
- Task name
- Task description icon
- Task deadline
-
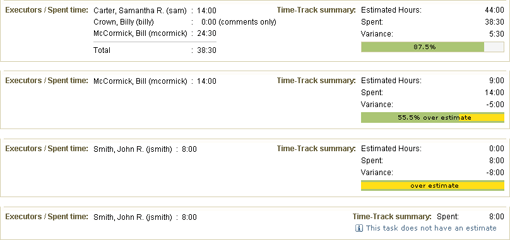
Time-Track Summary
Time estimates are available with Management Extension only
- Date of the last time-track submission
- Total time spent on the task
- Time estimate specified for the task
- Variance between estimated and spent time
- Option for completion or deletion of the task
Variance between estimated and spent time is calculated as:
<Variance> = <Time Estimate> - <Spent Time>
When spent time is less than time estimate, variance is positive and means remaining time.
When spent time is greater than time estimate, variance is negative and means extra time spent for the task.
If time estimate is not shown for a task, this means that this task
does not have an estimate.
Total time spent on the task as well as date of the last time-track submission may be hidden in the interface
if option 'Do not display reported time and comments of other users on pages with detailed task information' is set in the system settings.
See Adjust General System Settings section for more information.
Task names, deadlines, and description icons are clickable:
- Clicking a task name opens View Open Task interface.
- Clicking a deadline opens a pop-up window for editing the deadline.
- Clicking a task description icon opens a pop-up window for editing the corresponding task description.
If a deadline date is in the past, it is shown in red color.
When there are more than 20 open tasks to show, a pager appears.
You can switch pages by clicking the links under the task list.
To change the number of tasks simultaneously shown on one page select the corresponding option in the
'Show XX tasks on a page' drop-down above the task list.
For information on how to complete selected tasks see section Complete Tasks.
Edit Task Deadline When Browsing Open Tasks
You can edit task deadlines directly in the list of open tasks.
For information on how to get to the Open Tasks interface see section
Browse Open Tasks.
To edit a task deadline follow the instructions below:
-
Click a deadline you want to edit.
This will open a pop-up window for editing the deadline:
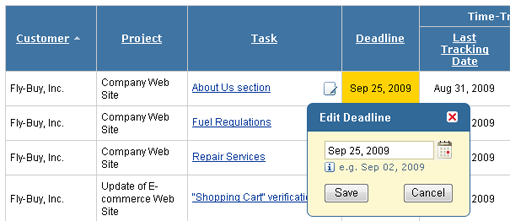
Pop-up window for editing deadline
-
Enter (or edit) the deadline.
The system accepts a variety of date formats.
For example: "Mon DD, YY", "Month DD, YYYY", "MM/DD/YY", etc.
So you can enter deadline using almost any date format you like.
-
Click 'OK' button to save the entered deadline.
This will save modifications in the system and update task deadline in the list of open tasks.
If you decided not to modify the selected deadline, click 'Cancel' button.
The system will discard the modifications and close the pop-up window.
Edit Task Description When Browsing Open Tasks
You can edit task descriptions directly in the list of open tasks.
For information on how to get to the Open Tasks interface see the section
Browse Open Tasks.
To edit a task description follow the instructions below:
-
Click the description icon shown next to the name of the corresponding task.
This will open a pop-up window for editing the description:
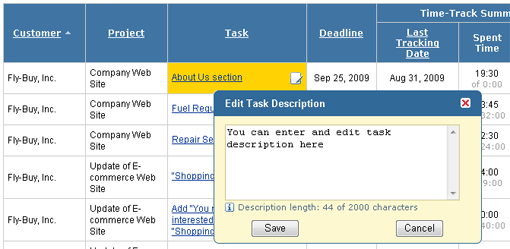
Pop-up window for editing description
-
Enter (or edit) the description.
Size of task description shall be less than 2000 characters.
-
Click 'OK' button to save the entered description.
If you decided not to modify the selected description, click 'Cancel' button.
The system will discard the modifications and close the pop-up window.
Create New Tasks
If you have 'Manage Customers & Projects' access right, you can create new customers and projects when creating new tasks.
To create new tasks follow the instructions below:
-
Open Create New Tasks interface.
There are several interfaces from where you can get to the Create New Tasks interface:
-
Open Tasks interface
Click 'Create New Task' button to open the Create New Tasks interface.
The project and/or customer selected in the Open Tasks interface
before the click will be automatically pre-selected in the Create New Task interface.
For information on how to get to the Open Tasks interface see section
Browse Open Tasks.
-
The Active Projects & Customers interface
Select a project you want to add new tasks for and click 'add tasks' link next to the
project's name.
For information on how to get to the Active Projects & Customers interface see section
Browse Active Projects & Customers.
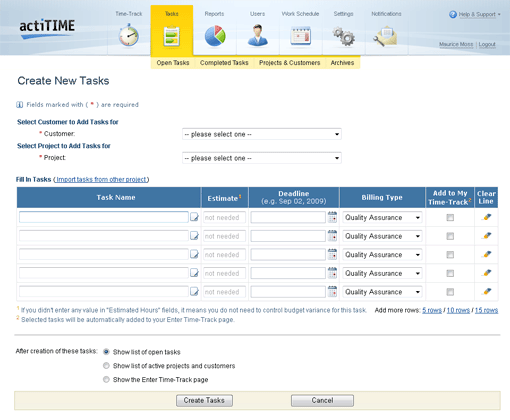
Create New Tasks interface
-
Select customer and project to add new tasks for (if necessary).
In most cases a customer and project will be pre-selected automatically.
However, you can change them if you need. Note that only active
customers and projects are available for selection.
Notes on selecting customer and project:
-
When you select a customer, the system refreshes the list of projects
to the active projects of the selected customer.
-
To create a new customer select '-- new customer --' option in the 'Customer' drop-down
and enter a name of the customer to create.
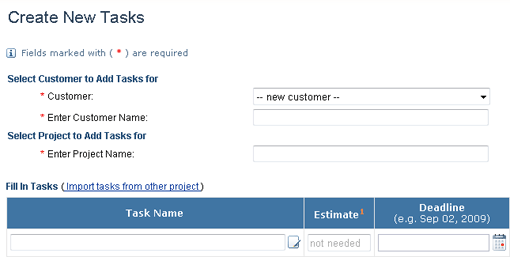
Create New Tasks page when '-- new customer --' option is selected
In this case you will also be required to specify a name of a new project to add tasks for.
-
To create a new project select '-- new project --' option in the 'Project' drop-down
and enter a name of the project to create.
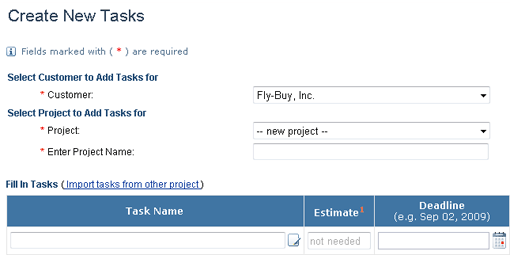
Create New Tasks page when '-- new project --' option is selected
-
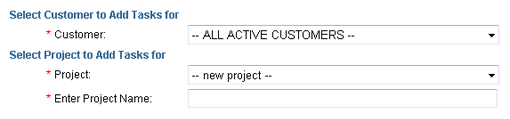
You can also create additional tasks for all active customers.
To do that select option '-- ALL ACTIVE CUSTOMERS --'
in the 'Customer' drop-down and then select project(s) to add tasks for:
-
To create additional tasks for all active projects in all active customers:
Select option '-- ALL ACTIVE PROJECTS --' in the 'Project' drop-down.

-
To create a new project with one or more tasks in all active customers:
Select option '-- new project --' in the 'Project' drop-down and specify name of a new project.
-
To create additional tasks for projects with the selected names in all active customers that have related projects:
Select option '-- SELECTED ACTIVE PROJECTS (by project name) --' in the 'Project' drop-down
and then choose names of the projects to add tasks for in the 'Select Projects by Name' list.
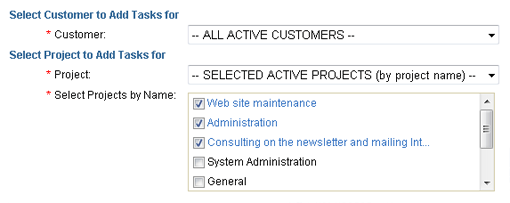
'Select Projects by Name' list contains an alphabetical list of all project names in all active customers.
For example, when there are two active customers with projects listed below:
'Select Projects by Name' list will contain the following options:
When user selects 'Project 1', then tasks will be added to both
'Customer A / Project 1' and to 'Customer B / Project 1'.
-
Enter information for the tasks to create.
You can simultaneously create as many tasks as you need.
If the tasks table contains doesn't contain the sufficient number of rows, use links under the table to add more rows to it.
Information that can be specified for a new task:
-
Task name
Task name shall be unique among the tasks registered in the selected project.
The check for uniqueness is case-insensitive.
So task names 'User Management Interfaces' and 'user management interfaces' will be considered as the same.
-
Time Estimate
Time estimates are available with Management Extension only
Enter time estimate in the format hh:mm or ##.##. The entered value will be used for
calculations in the Estimated vs. Actual Time Report.
You can leave this field blank. This will mean that you do not need to control budget variance for this task.
-
Deadline
Task deadline is shown in the Enter Time-Track interface.
Fill in deadline, if you want to inform task executors about it via actiTIME interfaces.
The system accepts a variety of date formats.
For example: "Mon DD, YY", "Month DD, YYYY", "MM/DD/YY", etc.
So you can enter deadline using almost any date format you like.
-
Billing type
Select one of the registered billing types.
By default billing type for all new tasks is pre-set to the default billing type configured for the system
(see section Billing Type Management for information
on how to set the default billing type).
-
Description
To enter a description for a task click an icon located next to the task name.
This will open a pop-up window for entering description:
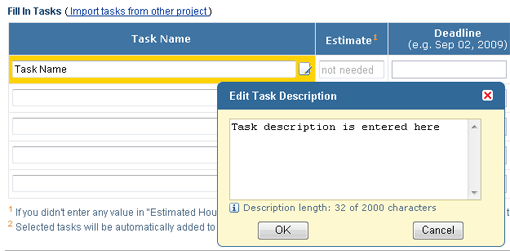
Pop-up window for entering description
Enter a description and click 'OK' button.
Size of task description shall be less than 2000 characters.
If you decided not to add a description click 'Cancel' button.
Note that if you specified a deadline and/or description for a task,
you will be required to enter a task name as well.
If you are granted the "Enter Time-Track" access right,
you can mark tasks that should be automatically added to your Enter Time-Track interface
once they are created.
Instead of entering tasks information manually you can copy it form an existing project.
To do that click 'Import tasks from other project' link located over the tasks table.
This will open the Import Tasks From Other Project pop-up window:
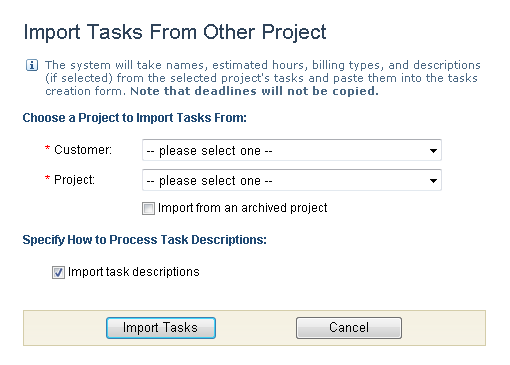
Pop-up window for selection of a project to copy tasks information from
Select a project to copy tasks information from and then click 'Import Tasks' button.
This will copy tasks information from the selected project and add it to the list of tasks to create.
-
When you are ready, submit the page by clicking 'Create Tasks' button at the bottom
of the interface. The system will create new tasks with the specified parameters
and show you the Open Tasks interface.
Tasks selected in the column 'Add to My Time-Track' will be automatically added to your Enter Time-Track interface.
If you decided not to add new tasks, click 'Cancel' button at the bottom of the page.
The system will discard all the information entered in the interface and show you the
interface from where you got to the Create New Tasks interface.
View Open Task
Click a task name on the Open Tasks interface.
The system will show the View Open Task interface.
For information on how to get to the Open Tasks interface
see section Browse Open Tasks.
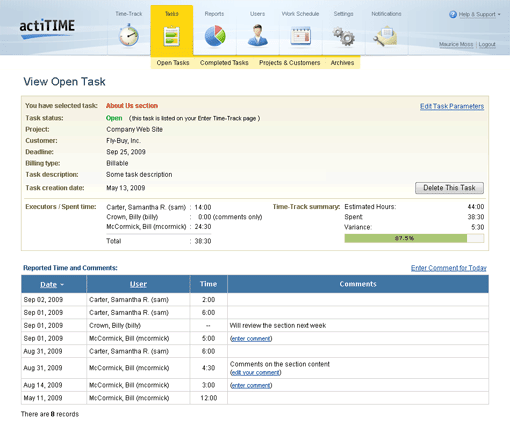
View Open Task interface
Time estimates are available with Management Extension only
The interface shows general task information as well as all time and comments reported for the task.
Sub-sections 'Executors / Spent time' and 'Time-Track summary' show summary time-track information for the task.
Time-Track Summary sub-section with different combinations of estimated and spent time
Information about task executors as well as time-track summary, time-track, and comments of other users may be hidden in the
interface if option 'Do not display reported time and comments of other users on pages with detailed task information'
is set in the system settings. See the Adjust general system settings section for more information.
If selected task is not listed on your Enter Time-Track page,
you can add it there by clicking the link 'list this task on your Enter Time-Track page'
shown after the task status.
Add and Edit Comments for an Open Task
In the View Open Task interface you can add comments to your time-track
reports and edit existing task comments made by you.
For information on how to get to the View Open Task interface
see section View Open Task.
Note that you cannot add comments for the time-track reported by other users
as well as you cannot edit comments made by other users.
Process of adding task comments and process of editing task comments are very similar.
To add / edit task comments follow the instructions below:
-
Open the View Open Task interface
-
To enter comments for an existing time report
click either 'enter comment' or 'edit your comment' link (if some comment already exists)
in the corresponding time report row.
If you need to add a comment to the selected task,
but you did not report any time-track for this task, click 'Enter Comment for Today'
link located over the table with time-track and comments.
You will get a pop-up window for editing task comments:
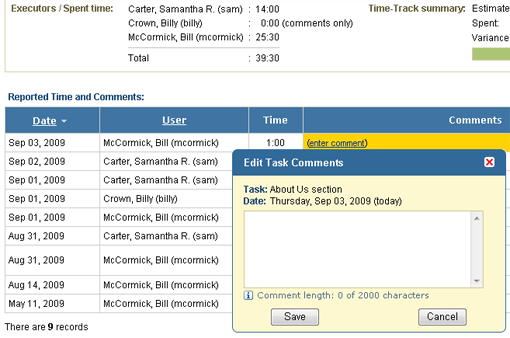
Pop-up window for editing comments
-
Enter (or edit) the comment.
-
Click 'OK' button to save the entered comment.
This will save modifications in the system and update the View Open Task interface.
If you decided not to modify/enter task comments, click 'Cancel' button.
The system will discard the modifications and close the pop-up window.
Edit Open Task
To edit an open task follow the instructions below:
-
Open the interface 'View Open Task' for the corresponding task (see section
View Open Task).
-
Click 'Edit Task Parameters' link to get to the Edit Open Task interface.
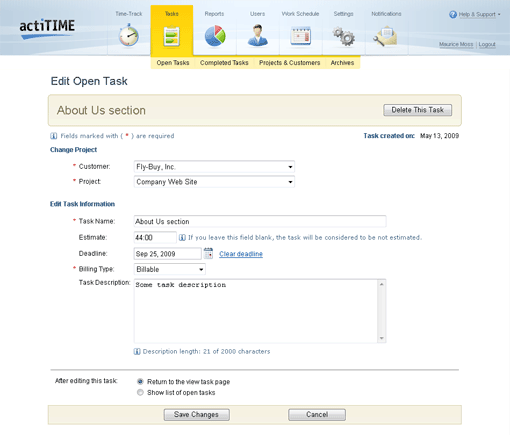
Edit Open Task interface
-
Modify task information. Fields marked with a red asterisk are mandatory.
Information that can be modified for an open task includes:
-
Customer and project this task belongs to
By changing the task project you can move the selected task between registered projects.
You cannot move an open task to an archived project.
-
Task name
Task name shall be unique among the tasks registered in the selected project.
The check for uniqueness is case-insensitive.
So task names 'User Management Interfaces' and 'user management interfaces' will be considered as the same.
-
Time Estimate
Time estimates are available with Management Extension only
Enter time estimate in the format hh:mm or ##.##. The entered value will be used for
calculations in the Estimated vs. Actual Time Report.
You can leave this field blank. This will mean that you do not need to control budget variance for this task.
-
Deadline
Task deadline is shown in the Enter Time-Track interface.
Fill in the deadline, if you want to inform task executors about it via actiTIME interfaces.
-
Billing type
Select one of the registered billing types.
-
Description
-
Select an interface you want to switch to after editing the task.
To edit information of other open tasks select option 'Show list of open tasks',
otherwise select option 'Return to the view open task page'.
-
Submit the modifications by clicking 'Save Changes' button at the bottom of the page.
The system will store the modifications made in the interface and show you
either the View Open Task or the Open Tasks interface
(depending on the selection made on the previous step).
Click 'Cancel' button at the bottom of the page, if you decided not to edit the selected task.
The system will reject all modifications of the task information and show you the View Open Task interface.
Complete Tasks
To complete one or several tasks follow the instructions below:
-
Go to the Open Tasks interface (see section Browse Open Tasks for information on how to get to this page).
-
Select tasks to complete. To do that select the corresponding checkboxes in the rightmost table column.
If you want to select all open tasks shown on the page, click 'All' link
in the header of 'Select Tasks' column.
If you want to deselect all selected tasks, click 'None' link in the header of 'Select Tasks' column.
-
Click 'Complete Selected Tasks' button at the bottom of the page.
The system will complete the selected tasks and show you the Open Tasks interface.
Tasks completion date will be set to the date of the last time-track reported for each task.
If no time and comments were reported for a task, its completion date will be set to the date of task completion.
You can edit task completion date in the Edit Completed Task interface
(see section Edit Completed Task for more information).
Tasks that were completed can be browsed on the Completed Tasks interface
(see section Browse Completed Tasks for information on how to get to this page).
Browse Completed Tasks
Select the option 'Completed Tasks' in the top-level menu 'Tasks' to open the Completed Tasks
interface.
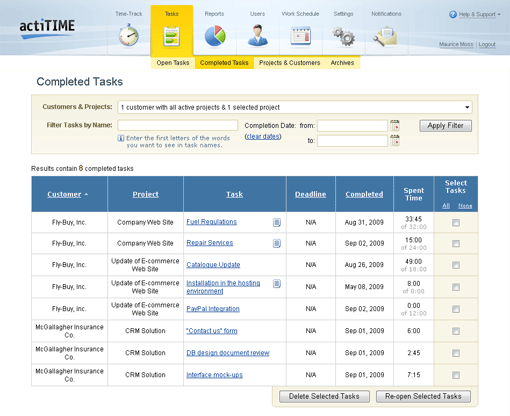
Completed Tasks interface
By default the interface is configured to show all completed tasks for all active customers and projects.
To browse all completed tasks registered in actiTIME select 'All projects of all customers (active and archived)'
option in the filter by customers and projects.
If you want to browse completed tasks that are associated with particular customers and/or projects,
select the corresponding customers and projects in the filter:
Filter by Customers and Projects
-
Select checkbox near a customer name to get all completed tasks of this customer projects
When you select a customer all its project are automatically selected.
When you de-select a customer, selection is cleared from all customer projects as well.
-
Select checkbox near a project name to get all completed tasks of this project.
To select all customer projects but one, select the corresponding customer and then
de-select the project you do not want to see.
-
To see archived customers and projects in the customers and projects selector,
select 'Show archived customers and projects...' checkbox above the list of customers and projects.
If you select a customer when option 'Show archived customers and projects...' is not selected,
tasks of the archived projects of this customer will not be shown.
In addition to filtering tasks by customers and projects, you can:
The Completed Tasks interface provides you with brief description of completed tasks.
For each of the tasks shown this information includes:
- Customer the task is associated with
- Project the task is associated with
- Task name
- Task description icon (for those tasks which have a description)
- Task deadline
-
Completion date
Time estimates are available with Management Extension only
- Total time spent on the task
- Time estimate specified for the task
- Option for re-opening the task
Total time spent on the task may be hidden in the interface
if option 'Do not display reported time and comments of other users on pages with detailed task information' is set in the system settings.
See the Adjust general system settings section for more information.
Task names and description icons are clickable:
- Clicking a task name opens the Edit Completed Task interface.
- Clicking a task description icon opens a pop-up window for viewing the corresponding task description.
When there are more than 20 completed tasks to show, a pager appears.
You can switch pages by clicking the links under the task list.
To change the number of tasks simultaneously shown on one page select the corresponding option
in the 'Show XX tasks on a page' drop-down above the task list.
For information on how to re-open selected tasks see section Re-open Tasks.
View Completed Task
Click a task name on the Completed Tasks interface.
The system will show the View Completed Task interface.
For information on how to get to the Completed Tasks interface
see section Browse Completed Tasks.
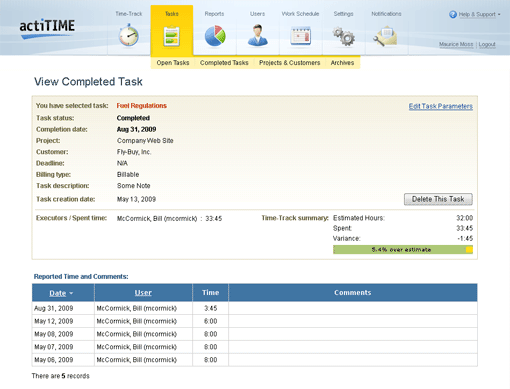
View Completed Task interface
The interface shows general task information as well as all time and comments reported for the task.
Information about task executors as well as time-track and comments of other users may be hidden in the interface
if option 'Do not display reported time and comments of other users on pages with detailed task information' is set in the system settings.
See the Adjust General System Settings section for more information.
Edit Completed Task
To edit a completed task follow the instructions below:
-
Open the interface 'View Completed Task' for the corresponding task (see section
View Completed Task).
-
Click 'Edit Task Parameters' link to get to the Edit Completed Task interface.
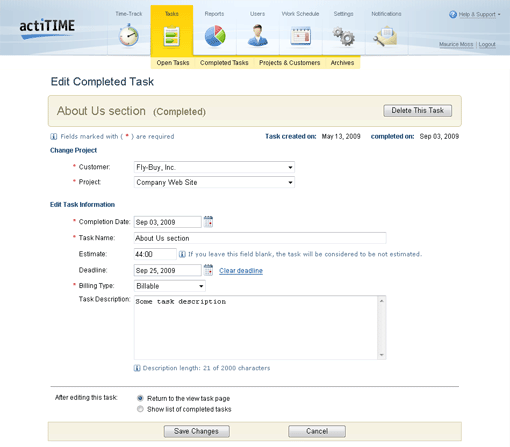
Edit Completed Task interface
-
Modify task information. All fields marked with a red asterisk are mandatory.
Information that can be modified for a completed task includes:
-
Customer and project this task belongs to
By changing the task project you can move the selected task between registered projects.
-
Completion date
Specify a completion date that is most suitable for your accounting procedure.
The system accepts a variety of date formats.
For example: "Mon DD, YY", "Month DD, YYYY", "MM/DD/YY", etc.
So you can enter completion date as well as deadline using almost any date format you like.
-
Task name
Task name shall be unique among the tasks registered in the selected project.
The check for uniqueness is case-insensitive. So task names 'User Management Interfaces' and 'user management interfaces' will be considered as the same.
Time estimates are available with Management Extension only
Time estimate
-
Deadline
- Billing type
- Description
-
Select an interface you want to switch to after editing the task.
To edit information of other completed tasks select option 'Show list of completed tasks',
otherwise select option 'Return to the view completed task page'.
-
Submit the modifications by clicking 'Save Changes' button at the bottom of the page.
The system will store the modifications made in the interface and show you
either the View Completed Task or the Completed Tasks interface
(depending on the selection made on the previous step).
If you decided not to edit the selected task, click 'Cancel' button at the bottom of the page.
The system will reject all modifications of the task information and show you the View Completed Task interface.
Re-open Tasks
You can re-open tasks from archived projects only if you have both 'Manage Tasks' and 'Manage Customers & Projects' access rights.
To re-open one or several tasks follow the instructions below:
-
Go to the Completed Tasks interface
(see section Browse Completed Tasks for information on how to get to this page).
-
Select tasks to re-open. To do that select the corresponding checkboxes in the rightmost table column.
If you want to select all completed tasks shown on the page, click 'All' link
in the header of 'Select Tasks' column.
If you want to deselect all selected tasks, click 'None' link in the header
of 'Select Tasks' column.
-
Click 'Re-open Selected Tasks' button at the bottom of the page.
The system will re-open the selected tasks and show you the Completed Tasks interface.
If you are re-opening tasks from an archived project, this project will be automatically
restored from the archives.
Tasks that were re-opened can be browsed on the Open Tasks interface
(see section Browse Open Tasks for information on how to get to this page).
Delete Tasks
You can delete tasks from archived projects only if you have both 'Manage Tasks' and 'Manage Customers & Projects' access rights.
There are three ways to delete tasks:
-
Select tasks to delete on the Open Tasks interface and then click 'Delete Selected Tasks' button at the bottom of the page.
(See section Browse open tasks for information on how to get to the Open Tasks page).
-
Select tasks to delete on the Completed Tasks interface and then click 'Delete Selected Tasks' button at the bottom of the page.
(See section Browse completed tasks for information on how to get to the Completed Tasks page).
-
Click 'Delete This Task' button on either the View Task interface or the Edit Task interface
(see sections View Open Task and
Edit Open Task for information on how to get to these pages).
In both cases you will be asked to confirm task deletion.
If you confirm it, the system will delete the selected tasks along with all time and comments reported for them
and show you the Open Tasks interface.
Be very careful when deleting tasks. This action cannot be undone.
When you delete tasks with reported time-track, all this information is deleted permanently.
After deletion it will no longer be available in the system reports.
You should have either 'Manage Customers & Projects' or 'Manage Users' access right,
to be able to delete tasks that have locked time or comments reported for them.