-
Names of the Time-Track Hierarchy Levels
You can rename the top, middle, and lowest (time-entry) levels of the time-track hierarchy
using pre-configured or custom names. The selected names are used in all
system interfaces to reference the corresponding hierarchy levels.
The pre-configured hierarchy names are listed below:
-
Top level:
- Client
- Customer (the default name)
- Product
- Product Line
- Project
-
Middle level:
- Job
- Project (the default name)
- Product
- Release
- Task
-
Lowest level:
- Task (the default name)
- Subtask
To use a custom name for a hierarchy level, select the '-- custom name --' option
for the corresponding level and enter the name in the singular and plural forms.

Using custom name for the top hierarchy level
Note that different hierarchy levels cannot have the same name.
Time-track is always reported for the lowest hierarchy level.

Settings Interface: Planning sub-section
-
Time estimates support
Time estimates are available with Management Extension only
Disable this feature if you do not need the support of time estimates on the time entry level.
This will hide all interface elements for entering and displaying time estimates, including the Estimated vs. Actual Time report.
Settings Interface: Time-Track sub-section
-
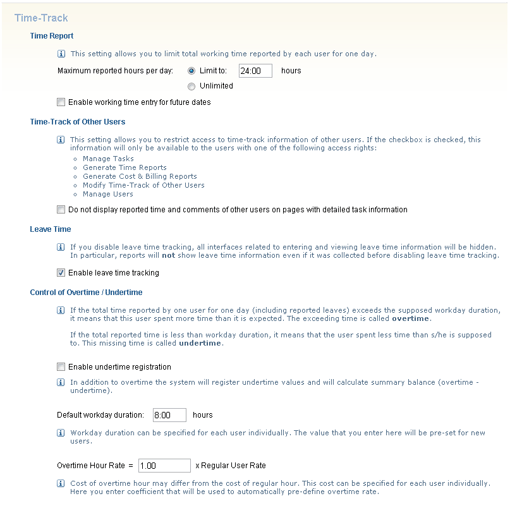
Maximum number of hours that can be reported by a user for a day
You can either limit the sum of hours that can be reported by a user for one day (up to 24 hours)
or set it as unlimited.
The latter is useful when several people (e.g. representing a subcontractor)
report their time expenses as a single actiTIME user.
-
Working time entry for future dates is available with Management or Accounting Extension only
Working time entry for future dates
Enable this feature if you want to allow users to enter working time in advance.
When 'leave time tracking' feature is enabled, users will be able to report
leave time for planned leaves even if 'Working time entry for future dates' is disabled.
-
Time-track of other users
This option defines whether users, that have neither "Manage Customers & Projects", nor "Generate Time Reports",
nor "Modify Time-Track of Other Users" access rights, can see time track and comments
entered by other actiTIME users:
-
When the option is selected, users without the access rights listed above
can see only their own time track and comments.
-
When the option is not selected, any user who has the "Enter Time-Track"
access right can see time track and comments entered by other users.
-
Leave time tracking
If you disable this feature, all interfaces related to entering and viewing leave time information will be hidden.
In particular, reports will not show leave time information even if it was collected before disabling leave time tracking
-
Control of Overtime/Undertime
The system supports two modes of overtime/undertime calculation:
-
Collect both overtime and undertime
Select the 'Enable undertime registration' option to choose this calculation mode.
When this mode is selected, the system collects both overtime and undertime (as negative values);
and the Overtime & Leaves report shows balance of overtime and undertime.
-
Collect overtime only
Uncheck the 'Enable undertime registration' option to choose this calculation mode.
When this calculation mode is selected, the system does not allow collecting undertime, and
all system interfaces related to overtime/undertime (including reports) reference overtime only.
-
Default workday duration
The configured value is used as the default value for user's workday duration
when you create actiTIME users.
-
Default overtime rate
Hourly rates are available with Accounting Extension only
The configured coefficient is used to pre-set overtime rate when editing hourly user rates in the
user management interfaces (see section User Management).
Settings Interface: Reporting sub-section
-
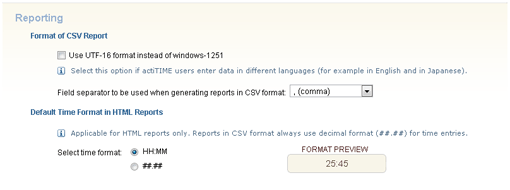
Settings for reports generated in CSV format
You can configure a character set and a field separator to be used in CSV reports.
There are two character sets available for selection:
-
International character set (UTF-16)
If you select this character set, all international characters will be shown in CSV reports properly,
but you will be able to use only the predefined field separator (<TAB>).
-
Character set configured on the computer where actiTIME is installed (selected by default).
If you select this option, you will have to use only one character set, but will be able to select a field separator for CSV reports.
Most likely, the character set configured on the computer
where actiTIME is installed is your national character set. So if your reports
will not contain data in other languages, you may select this option to be able
to use a specific field separator in CSV format.
If Microsoft Excel shows the data of your CSV reports improperly,
choose the same field separator as configured in the Regional Options of your computer.
-
Default time format in HTML reports
You can pre-configure how to format time shown in the HTML reports.
The available options are:
Note that this option does not affect reports generated in the CSV format.
Reports in CSV format always use decimal format (##.##) for time entries.
Settings Interface: Formats sub-section
-
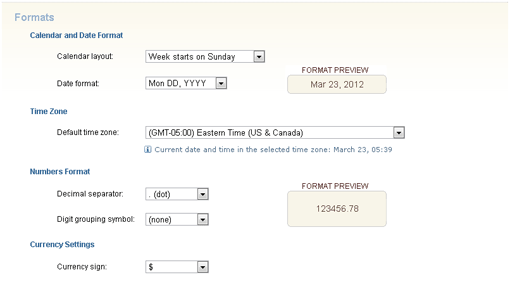
Calendar layout
You can set any day of the week
to be the first working day displayed by the system:
- Week starts on Sunday
- Week starts on Monday
- ...
- Week starts on Saturday
-
Date format
This setting affects all pages where a date is displayed, for example, task lists and reports.
Note that there is an example of a date in the selected format
shown next to the 'Date Format' drop-down.
-
Time Zone
The configured value is used as the default value for user's time zone when you add create actiTIME users.
-
Numbers format
You can configure decimal separator and digit grouping symbol to be used in actiTIME.
-
Currency sign
You can configure currency sign to be used in actiTIME for money amounts and rates.
Settings Interface: Email Settings sub-section
-
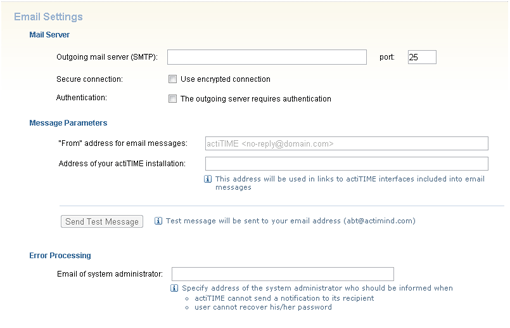
Email Settings
Email settings include the following parameters:
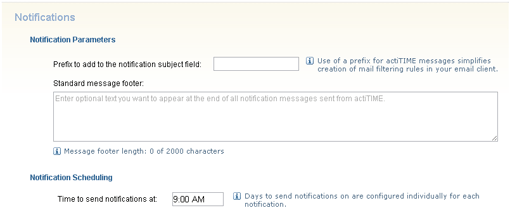
Settings Interface: Notifications sub-section
-
Notification Settings
Notification include the following parameters:
-
Message Parameters
-
Prefix to add to the notification subject field - you can add an optional text
to the beginning of messages subject to simplify creation of message filtering rules.
-
Optional message footer - standard text that you want to appear
at the end of all notification messages sent from actiTIME.
-
Message Scheduling
-
Time of day to send notifications at.
The time to send notifications at is the same for all users but depends on the time zone set for the user.