User Management
Overview
User management includes the following activities:
There are a number of access rights that define a user's permission to access actiTIME interfaces and data.
Each user can be granted one or more access rights. The role executed by a user,
as well as the category a user belongs to, depend on the access rights granted to the user.
There are no pre-defined user categories (or roles) in actiTIME.
You just grant a user those access rights that are necessary for his/her everyday work, and that is all.
To access the user management interfaces, use top-level menu 'Users'.
Only users who have 'Manage Users' access right can access the user management interfaces.
Note that the users who do not have this right will not see the user administration interfaces at all.
For the security purposes change the predefined password of 'admin' user before creating system users.
Browse System Users
When you click on 'Users' option of the top-level menu,
User List interface with all registered system users shows up.
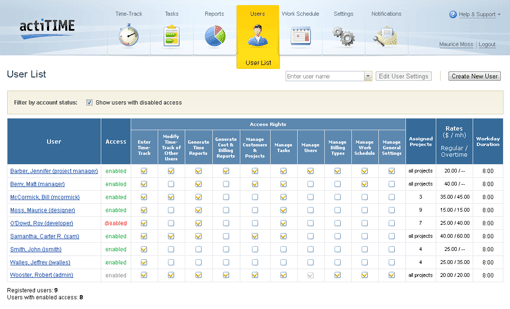
User List interface
The User List interface allows you to get summary information and status of system users at a glance.
For each user this information includes:
- Last name, first name, middle initial, and username
- Status of the user's account
-
Access rights granted to the user
-
Number of projects this user has access to
You can specify hourly rates with Accounting Extension only
- Effective hourly rates configured for the user: Regular Rate and Overtime Rate
- User's workday duration
User names, statuses of the users' accounts, and access rights are clickable:
-
Clicking a user name opens the Edit User Settings interface.
Note that your name is not clickable as you cannot modify your own access rights.
To modify your password and/or contact information use the My Account interface instead of the
user management interfaces (see section Modify own information and/or password).
-
Clicking status of the user's account switches it from the 'enabled' to the 'disabled' state and vice-versa
-
Clicking an access right grants/revokes it to/from the user
(depending on the current status of the access right)
When there are more than 20 users, a pager appears. You can switch pages by clicking the links under the user list.
To change the number of users simultaneously shown on one page select the corresponding option in the
'Show XX users on a page' drop-down under the user list.
Create New User
To create a new user follow the instructions below:
-
Click 'Create New User' button on the User List interface to open the Create New User interface.
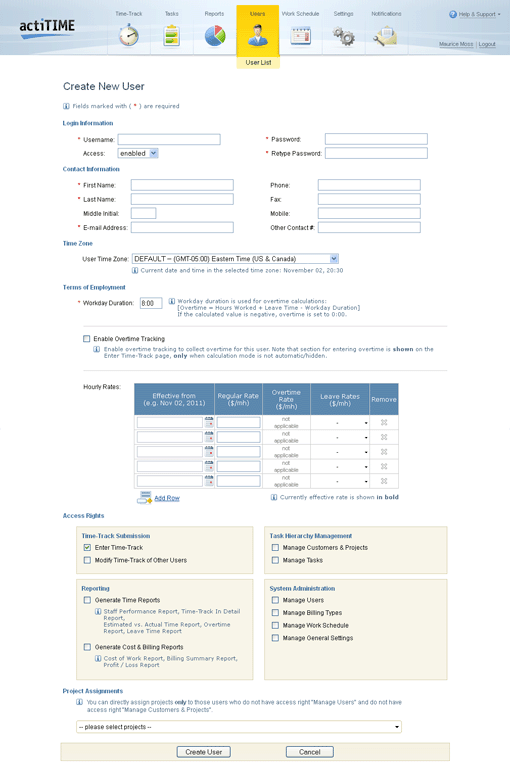
Create New User interface
-
Enter user information. The information in the fields marked with a red asterisk is mandatory.
User information that can be specified for a new user includes:
-
Username
Username shall be unique among the registered users.
The check for uniqueness is case-insensitive.
So usernames 'john' and 'John' will be considered as the same.
- Status of the user's account - either enabled or disabled
-
Password
Note that password is case-sensitive.
- First name
- Last name
- Middle initial
-
E-mail address
Provided e-mail address should be valid. For example, address yournick@domain.com is valid,
but addresses yournick.domain.com and yournick@com are invalid.
- Phone #
- Fax #
- Mobile #
- Other contact #
-
Time zone
By default user's time zone is pre-set to the default system time zone that is configured in the system settings.
-
Workday duration
Workday duration is used for tracking user's leave time and overtime/undertime.
-
Overtime/undertime tracking settings
When undertime tracking is turned OFF in the general system settings,
the system collects overtime information only, and the corresponding option
is named 'overtime tracking settings'.
Overtime/undertime tracking may be either enabled or disabled:
-
If you enable overtime/undertime tracking for the user,
you should also specify overtime/undertime calculation mode to be used and hire date.
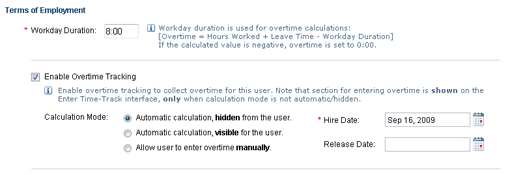
Overtime/Undertime Tracking Options
Calculation mode can be one of the following:
-
Automatic calculation, hidden from the user - if this mode is selected,
section displaying overtime/undertime is not shown on the user's interface Enter Time-Track.
-
Automatic calculation, visible for the user - if this mode is selected,
section displaying overtime/undertime
is shown on the user's interface Enter Time-Track, but user cannot modify the
automatically calculated values.
-
Allow user to enter overtime/undertime manually - if this mode is selected,
section displaying overtime/undertime
is shown on the user's interface Enter Time-Track, and user is allowed to enter the
overtime/undertime manually.
See also sections
Enter Your Time-Track for the Current Week
and Overtime & Leaves Report.
-
When overtime/undertime tracking is disabled,
section for entering overtime/undertime is hidden on the user's interface Enter Time-Track.
-
You can specify hourly rates with Accounting Extension only
Hourly rates
Hourly rates that can be specified for the user include:
-
Regular rate - rate for the regular working hours
-
Overtime rate - rate for the overtime hours
Overtime rate can be entered only when overtime/undertime tracking is enabled for the user.
-
Leave time rates - rates for all active leave types registered in the system
Note that you cannot specify rates for archived leave types when creating a new user.
However, if you need to specify a rate for an archived leave type, you can do that in the Edit User Settings interface.
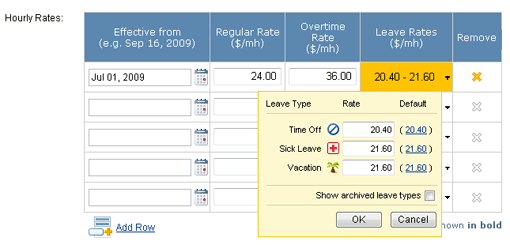
Hourly Rates Section
When you enter a regular rate, overtime and leave time rates are automatically
filled in with the default values. These default values are calculated on the base of
coefficients specified in
The specified rates come into effect on the corresponding effective date.
If there are no rates specified for a user, all the rates are considered to be '0.00'.
All working and leave time reported by the user before the first effective date is processed using zero ('0.00') rates.
-
You can configure project assignments with Management Extension only
Set of access rights that should be granted to the user
-
Projects this user should have access to
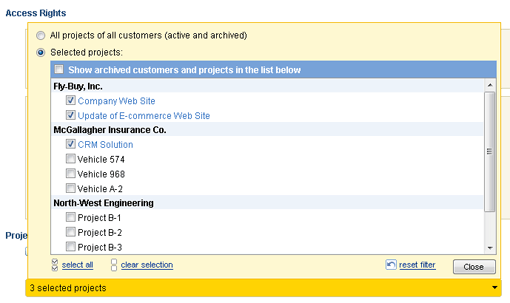
Projects Selector
If you want to allow user's access to all projects of all customers (including customers and projects that will be created in the future),
choose the "All projects of all customers (active and archived)" option. Otherwise, just select a set of projects the user should have access to.
To select/unselect all project of a customer, double click on the line with customer name.
Users having access rights "Manage Users" and/or "Manage Customers & Projects"
always have access to all projects of all customers.
-
When you are ready, submit the page by clicking 'Create User' button
at the bottom of the interface. The system will create a new user and set his/her
login access according to the selected option.
If you decided not to add a new user, click 'Cancel' button at the bottom of the page.
The system will discard all the information entered in the interface and show you the User List interface.
Edit User Information and Access Rights
To edit user information and access rights follow the instructions below:
-
Click a user name on the User List interface to open the Edit User Settings interface.
For information on how to get to the User List interface see section
Browse System Users.
You can also choose a user to edit by typing in a part of user's name
or username in the user selector above the table with the user list.
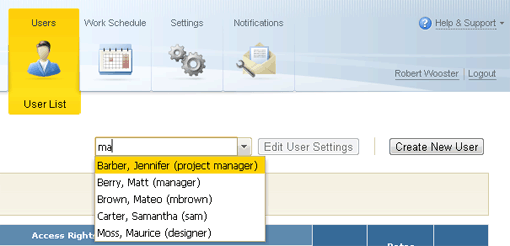
Selecting user to edit by his/her name
-
Modify user information. All the fields marked with a red asterisk are mandatory.
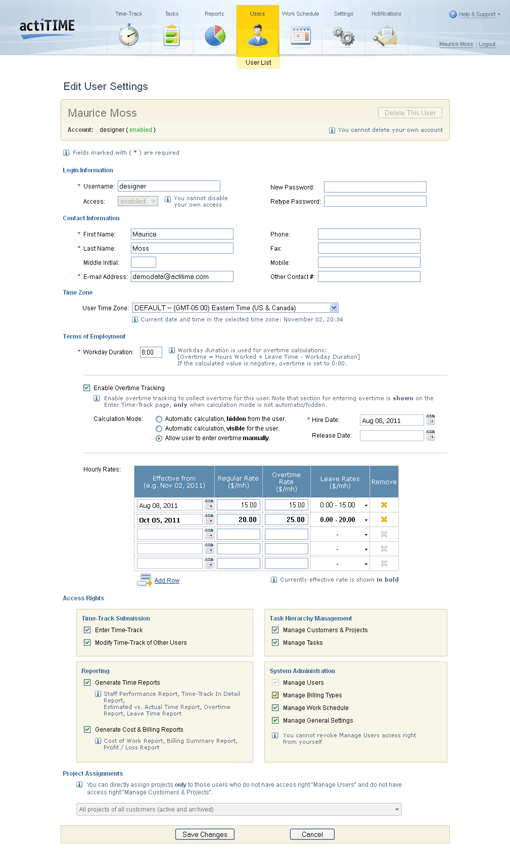
Edit User Settings interface
User information that can be modified includes:
-
Username
A username shall be unique among the registered users.
The check for uniqueness is case-insensitive. So usernames 'john' and 'John' will be considered as the same.
If you try to assign a duplicate username to the selected user,
the system will not save the modifications made in the interface and will ask you
to select another user name.
- Status of the user's account - either enabled or disabled
-
Password
Note that password is case-sensitive.
- First name
- Last name
- Middle initial
-
E-mail address
Provided e-mail address should be valid. For example, address yournick@domain.com is valid,
but addresses yournick.domain.com and yournick@com are invalid.
- Phone #
- Fax #
- Mobile #
- Other contact #
- Time zone
- Workday duration
-
Overtime/undertime tracking settings
When undertime tracking is turned OFF in the general system setting,
the system collects overtime information only, and the corresponding option
is named 'overtime tracking settings'.
See section Create New User for the detailed description of
overtime/undertime tracking settings.
-
You can specify hourly rates with Accounting Extension only
Hourly rates
Hourly rates that can be specified for the user include:
- Regular rate - rate for the regular working hours
- Overtime rate - rate for the overtime hours
-
Leave time rates - rates for the leave types registered in the system
Rates for archived leave types are optional.
See section Create New User for more information on the hourly rates.
-
You can configure project assignments with Management Extension only
Set of access rights granted to the user
-
Projects this user should have access to

Projects Selector
If you want to allow user's access to all projects of all customers (including customers and projects that will be added in the future),
choose the "All projects of all customers (active and archived)" option. Otherwise, just select a set of projects the user should have access to.
To select/unselect all project of a customer, double click on the line with customer name.
Users having access rights "Manage Users" and/or "Manage Customers & Projects"
always have access to all projects of all customers
-
Submit the modifications by clicking 'Save Changes' button at the bottom of the page
If you decided not to edit information of the selected user,
click 'Cancel' button at the bottom of the page.
The system will reject all the modifications of user information and
show you the User List interface.
Update User's Password
To update user's password follow the instructions below:
-
Go to the Edit User Settings interface
(see section Edit User Information).
-
Provide two (2) copies of the new password in the fields 'New Password' and 'Retype Password'.
When creating a password, note that it is case-sensitive.
-
Submit the new password by clicking 'Save Changes' button at the bottom of the page.
You can update user password along with other user's information
(see section Edit User Information).
To update your own password use the My Account interface
(see section Modify Own Information and/or Password).
Modify Own Information and/or Password
You cannot modify your own contact information and access rights via user management interfaces.
To modify your password and/or contact information use the My Account page.
-
Click the top-level menu option 'My Account'.
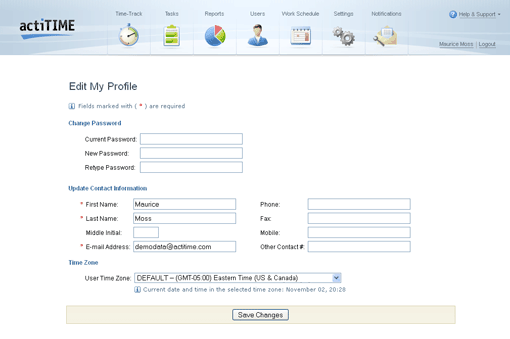
Edit Profile interface
-
Edit your contact information
Note the following when modifying your contact information:
-
All the fields marked with a red asterisk are mandatory.
-
Provided e-mail address should be valid.
For example, address yournick@domain.com is valid, but addresses yournick.domain.com
and yournick@com are invalid.
-
Change your current time zone
-
Create a new password if necessary.
Provide two (2) copies of the new password in the fields 'New Password' and 'Retype Password',
and your current password in the field 'Current Password'. When creating a password,
note that it is case-sensitive.
-
Submit the modifications by clicking 'Save Changes' button at the bottom of the page.
Disable User Account
Users cannot be completely removed from the system if they have reported some time-track.
Instead their login access can be disabled.
To disable user access to the system click status of the user's account directly on the User List
interface - the system will switch status of the user's account
from 'enabled' to 'disabled' state (see also section Browse System Users).
You can also disable user access to the system on the Edit User Settings interface:
-
Go to the Edit User Settings interface (see section Edit User Information).
-
Change the user's Access to 'disabled'.
-
Submit the page by clicking 'Save Changes' button at the bottom of the page.
The system will disable login access of the selected user and show you the User List interface.
You can re-enable the user's login access later, if necessary.
You can disable user access and update his/her information simultaneously
(see section Edit User Information).
Enable User Account
To enable user access to the system click status of the user's account directly on the User List
interface - the system will switch status of the user's account
from 'disabled' to 'enabled' state (see also section Browse System Users).
You can also enable user access on the Edit User Settings interface:
-
Go to the Edit User Settings interface
(see section Edit User Information).
-
Change the user's Access to 'enabled'.
-
Submit the page by clicking 'Save Changes' button at the bottom of the page.
The system will enable the login access of the selected user and show you the User List page.
You can enable user access and update his/her information simultaneously
(see section Edit User Information).
Delete User
To delete a user follow the instructions below:
-
Go to the Edit User Settings interface (see section Edit User Information).
-
Click 'Delete This User' button. You will be asked to confirm the user deletion. If you confirm it, the system will delete the user and show you the User List page.
Note that in the following cases users cannot be completely removed from the system:
You can disable their login access instead (see section Disable User Account).
If the system knows that a user cannot be deleted beforehand, 'Delete This User' button is disabled.