To enter your time-track follow the instructions below:
-
Click 'Enter Time-track' option in the top-level menu 'Time-Track'
to open the Enter Time-Track interface.
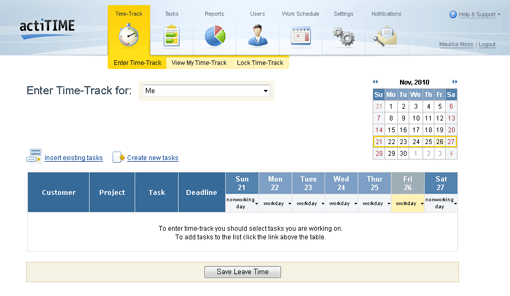
Enter Time-Track interface with no tasks selected
The interface will be pre-set to the current week. If there is some time-track stored for the
current week, it will be shown in the interface.
Note that every time you open the interface Enter Time-Track
using actiTIME menu it (interface) is pre-set to the current week.
-
Select tasks to enter time-track for.
You can choose some of existing tasks or create new tasks, if you have access right "Manage Tasks".
To add some of existing tasks:
-
Click 'Insert existing tasks' link above the table.
This will open 'Insert Existing Tasks to the Enter Time-Track Page' pop-up window.
By default this window will show all open tasks available for you.
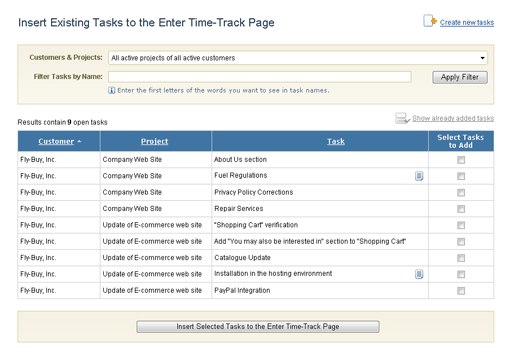
Insert Existing Tasks to the Enter Time-Track Page pop-up window
-
If this list contains too many tasks, you can filter tasks by customers, projects, and/or task names.
To filter tasks by customers and projects, select customers and/or projects you are working on in the
customer and project selector:
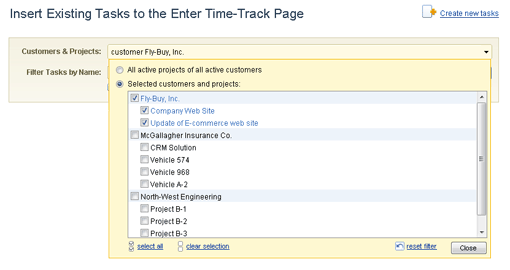
Selector of Customers and Projects
To filter tasks by task names enter the first letters of the words contained in task names in the 'Filter Tasks by Name' field.
For example, you may enter 'des' to find tasks containing word 'design' in their names.
Note that in this case task list will also contain tasks with words
'destination', 'description', 'desired', etc.
To narrow the search results enter more letters of the words to find.
You can specify more than one keyword in the 'Filter Tasks by Name' field.
In this case the system will show the tasks which names contain all the specified words.
-
Select tasks you want to enter time-track for by setting the corresponding checkboxes.
-
Click 'Add Selected Tasks to the List' button. This will show the selected tasks
in the Enter Time-Track interface and close the pop-up window.
To create new tasks:
Only users who have the "Manage Tasks" access right can create new tasks.
-
Click 'Create new tasks' link above the table.
This will open 'Create New Tasks' pop-up window.
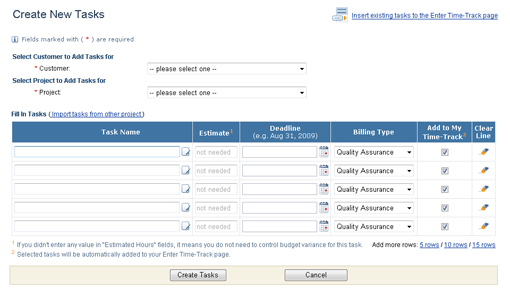
Create New Tasks pop-up window
-
Enter parameters of the tasks to create (see section Task Management: Create New Tasks for more information).
-
Click 'Create Tasks' button. This will create new tasks, add them to the Enter Time-Track interface, and close the pop-up window.
Tasks added to the Enter Time-Track interface will be available for entering time-track until they are completed
or until you remove them from the list (see section
Remove Tasks from the Enter Time-Track Interface for more information).
Note that you do not have to select tasks each time you are going to enter some time-track.
When you open this interface again, the selected tasks will be automatically shown ready
for entering time.
-
Enter the time spent on the selected tasks./p>
You can enter working time for future dates with Management or Accounting Extension only
When tasks for entering time-track are selected, the interface shows you a table
with columns that correspond to the days of week, and rows that correspond to the selected tasks.
To track the time spent for a task on a particular date, enter the time into the corresponding cell.
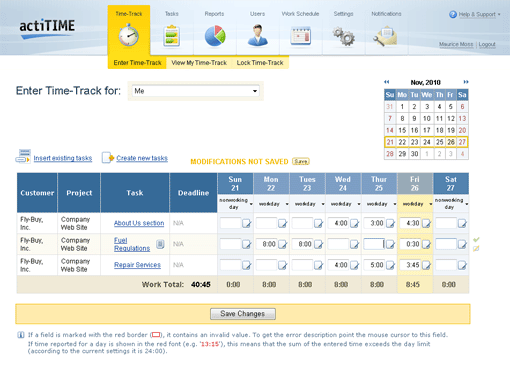
Enter Time-Track interface with some tasks selected,
overtime tracking is disabled
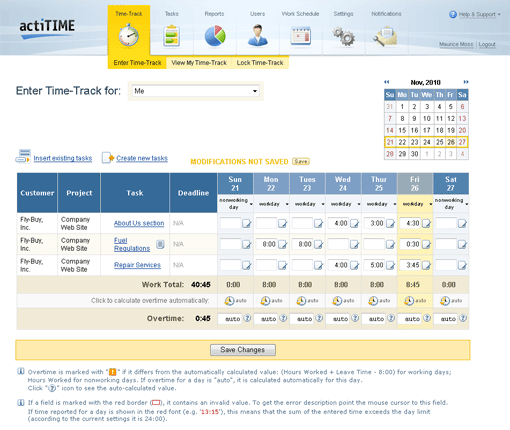
Enter Time-Track interface with some tasks selected,
overtime tracking is enabled
The time can be entered in two formats:
-
In HH:MM format, where HH means hours and MM means minutes.
In this format, 2 hours and 30 minutes should be entered as '2:30'.
Note that if you enter '2:5', this will be interpreted as '2:05'.
-
In the decimal format (##.##), where ##.## means a number of hours.
In this format, 2 hours and 30 minutes should be entered as '2.5'.
In both formats whole hours can be entered as HH. For example, 8 hours can be entered as '8',
or as '8:00', or as '8.0'.
You can enter working time for future dates only when the corresponding feature is enabled in the system settings
(see section Adjust General System Settings for more information).
Note that 'Week Total' row shows total time reported for the week as well as total time
reported for each day of the week.
-
Enter comments for the selected tasks.
To enter a comment on a task for a particular date click an icon located in the corresponding cell.
This will open the pop-up window for entering comments:
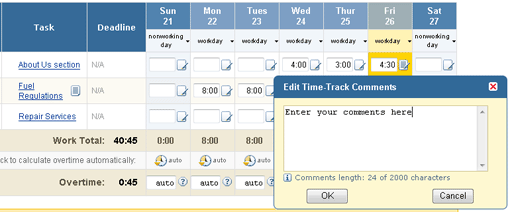
Pop-up window for entering comments
Enter a comment and click 'OK' button.
If you decided not to add a new comment click 'Cancel' button.
Note that comments (as well as spent time) are stored in the system
only when you submit them by clicking 'Save Changes' button.
If you enter some comments and then leave the interface without saving time-track,
all your modifications will be lost.
-
Enter leave time for the selected days (optionally).
To enter leave time for a particular date click a cell under this date in the header of the table
with time-track information. This will open the panel for entering leave time:
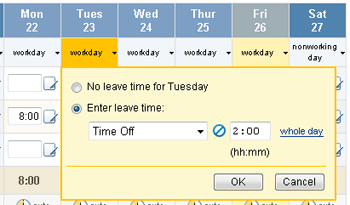
Panel for entering leave time
Select leave type in the drop-down, enter leave time, and click 'OK' button to close the panel.
If you decided not to enter leave time, click 'Cancel' button.
For each day you can enter time for one leave type only.
Only planned leaves are available for time entry for future dates.
If there are no planned leaves registered in the system, option for entering leave time for future dates will be disabled.
Note that information on leave time is stored in the system
only when you submit it by clicking 'Save Changes' button.
If you leave the Enter Time-Track interface without saving the changes, all your modifications will be lost.
-
Enter overtime/undertime for the selected days (optionally).
This step is available only for the users with enabled overtime/undertime tracking
whose overtime/undertime calculation mode is set to 'Allow user to enter overtime/undertime manually'.

Overtime/undertime section of 'Enter Time-Track' interface,
user is allowed to enter overtime/undertime
If overtime/undertime tracking is enabled and you are allowed to enter overtime/undertime information manually,
you can specify overtime/undertime in addition to the spent time.
When undertime tracking is turned OFF in the general system settings,
the system collects overtime information only. So the Enter Time-Track interface will
show (and allow to enter) overtime information only.
There are two ways how you can enter overtime/undertime for a day:
-
Enter overtime/undertime manually in the format HH:MM or in the format ##.##.
Positive entered values are considered as overtime.
Negative entered values are considered as undertime.
If entered overtime/undertime value differs from the automatically calculated value,
it is marked with an exclamation icon.
-
Click an icon above the corresponding overtime field to
calculate overtime/undertime automatically.
This will fill in the corresponding overtime field with 'auto' value.
Click the question mark icon shown next to the field to view the auto-calculated value.
Rules applied when calculating overtime/undertime automatically are described in the section
Reporting: Overtime & Leaves Report: Report Description.
Note that overtime value cannot be greater than hours worked reported for the corresponding date.
By default overtime/undertime fields are filled in with 'auto' value.
If overtime/undertime is not specified it is considered to be 0:00.
-
Complete the tasks you have finished working on.
See section Complete Tasks from the Enter Time-Track Interface
for more information.
You can complete tasks only if you have 'Manage Tasks' access right.
On time task completion will help you to shorten your task list shown in Enter Time-Track interface.
-
When you are ready, save the time-track by clicking 'Save Changes' button
at the bottom of the interface. The system will store the entered time and show you
the Enter Time-Track interface with a confirmation message.